

The Ripmo AF (Aluminum Frame) brings the award-winning performance of the carbon Ripmo to a wider, rowdier audience. It’s everything we love from the carbon Ripmo, plus a few tweaks. Best of all, complete bikes start at only $2,999.
| Version | V1 UDH |
| Frame Material | Aluminum |
| Frame Weight | 8.25 lbs / 3.74 kg (size M with Marzocchi Bomber Air) |
| Wheel Size | 29” / up to 2.5" tires |
| Front Travel | 160mm |
| Rear Travel | 147mm |
| Shock Specs | 210 x 55mm |
| Boost Axles | 148mm rear / 110mm front |
| Seatpost Diameter | 31.6mm |
| Rear Brake | 160mm Post mount / 203mm max rotor |
| Chainstay Length | 435mm |
| Bottom Bracket | Threaded (73mm English threaded) |
| Chainline | 55mm chainline, 182mm Q Factor |
| Derailleur Hanger | SRAM UDH |
| ISCG 05 Compatible | ISCG 05 Tab Mount available separately |
| Headset | ZS44 upper / ZS56 lower |
| Colors | Cinnabon Bronze or Espresso Black |
| Sizes | S / M / L / XL |
| Frame Warranty | Lifetime |


Marzocchi Z1 Spring Swap Guide
Added on: Aug 25, 2022
Swapping the coil spring in the Z1 is a quick and easy job. All you need is a 32 mm chamferless socket, slick honey, and your new spring.
Similar to adding or removing volume spacers, remove the air spring top cap assembly using the 32mm chamferless socket. Pull the red bottom out dumper, anti-rattle bumpers, and coil spring out of the fork.
Coat the new spring in slick honey, slide the new spring into the fork, re-install the anti rattle bumpers, and red bottom out bumper.
Re-install the air spring top cap assembly using the 32mm chamferless socket. Bounce the fork on the ground to ensure there is no coil rattle. Go for a plush and enjoyable shred!
120-150 lbs, Purple, Soft, 820-03-656-KIT
150-180 lbs, Blue, Medium, 820-03-657-KIT (Stock Configuration)
180-210 lbs, Green, Firm, 820-03-658-KIT
210-250 lbs, Yellow, X-Firm, 820-03-659-KIT
Ripmo Disassembly Tutorial
Added on: Apr 27, 2018
The linkage assemblies on the Ripmo are designed to be easily serviceable. Once every season, you should disassemble your frame, check all components, and replace wear items as needed.
This video walks you through the disassembly process. We have an assembly and bushing service tutorial available here: https://youtu.be/lOU7mwek00A
If you feel uncomfortable performing the work yourself, we recommend heading to your local shop for service.
Track: LFO Invasion | By: Josh Tonnissen
Visit: www.soundcloud.com/omniscientrecords
Ripmo Assembly and Bushing Service
Added on: Apr 27, 2018
The linkage assemblies on the Ripmo are designed to be easily serviceable. Once every season, you should disassemble your frame, check all components, and replace wear items as needed.
This video walks you through the assembly and bushing service for the Ripmo.
If you feel uncomfortable performing the work yourself, we recommend heading to your local shop for service.
Track: LFO Invasion | By: Josh Tonnissen
Visit: www.soundcloud.com/omniscientrecords
Ripmo AF Specific FAQs
All our manuals are available here. You can also find the Quick Setup guide for the Ripmo AF in the 'Setup' tab on the right.
You can find all our torque specs listed in the tab on the right. The Ripmo AF and Ripmo use the same torque specs.
We spec and recommend the DVO Jade X Coil shock, but you could run any clevis compatible coil shock. Brands that offer a clevis compatible coil shock include DVO, Cane Creek, EXT, Push, and Rockshox. We recommend verifying clevis compatibility with manufacturers before purchase.
Check out this video for instructions on how to swap the forks spring. The bike ships with a medium spring installed across all sizes. This spring is good for 150-180 lbs riders. Below are the appropriate part numbers for replacement springs:
- 120-150 lbs, Purple, Soft, 820-03-656-KIT
- 150-180 lbs, Blue, Medium, 820-03-657-KIT (Stock Configuration)
- 180-210 lbs, Green, Firm, 820-03-658-KIT
- 210-250 lbs, Yellow, X-Firm, 820-03-659-KIT
No, we designed the Ripmo AF specifically around 29” wheels.
The largest chainring the Ripmo AF can accommodate is a 34T.
Yes, the max size oval chainring we recommend is a 32T. Not all oval chainrings are the same, we recommend double checking clearance before installation.
The Ripmo AF has clearance for the majority of 2.5" tires. However, we cannot guarantee fitment of all tires. There's too much variation between manufacturer's measurements. We recommend installing your preferred tire without sealant. Release air from the rear shock and while cycling the bike through its travel, please ensure there is a minimum of 6mm of clearance between the tire and frame. If there is sufficient clearance, continue with the installation. If you have insufficient clearance, we recommend installing a different rear tire.
Swapping the coil spring in the Bomber Z1 is a quick and easy job, check out our guide here.
Yes, but the bike is optimized around a 44mm. The 51mm offset fork shortens the trail (the distance between the contact patch and the steering axis), which can cause the front end to feel less stable.
170mm crank on small and medium.
175mm crank on large and extra large.
40mm stem on small.
50mm stem on medium, large and extra large.
No. 160mm is the maximum allowable fork travel.
The Ripmo AF fits a 22 oz Purist bottles on size small, and a 26oz on all other sizes when the Arundel side loader cage is used.
The Ripmo AF uses 160mm post mount rear brake mounts.
To run a 180mm rotor, you'll use the following Shimano part number: SM-MA-F180P / P2
To run a 203mm rotor, you'll use the following Shimano part number: SM-MA-F203P / P
For more information, the following is a link to the adaptor chart:
Many of our paints are available online via My Perfect Color. Some automotive retailers have the ability to custom match paint.
The PMS color codes for our Ripmo AF frames are:
- Cinnabon Bronze:
- Primary Color: YS 7606 (M)
- Accent Color: PMS 8923
- Espresso Black:
- Primary Color: PMS black (M)
- Accent Color: PMS 2406
General FAQs
To see our general FAQs click here.
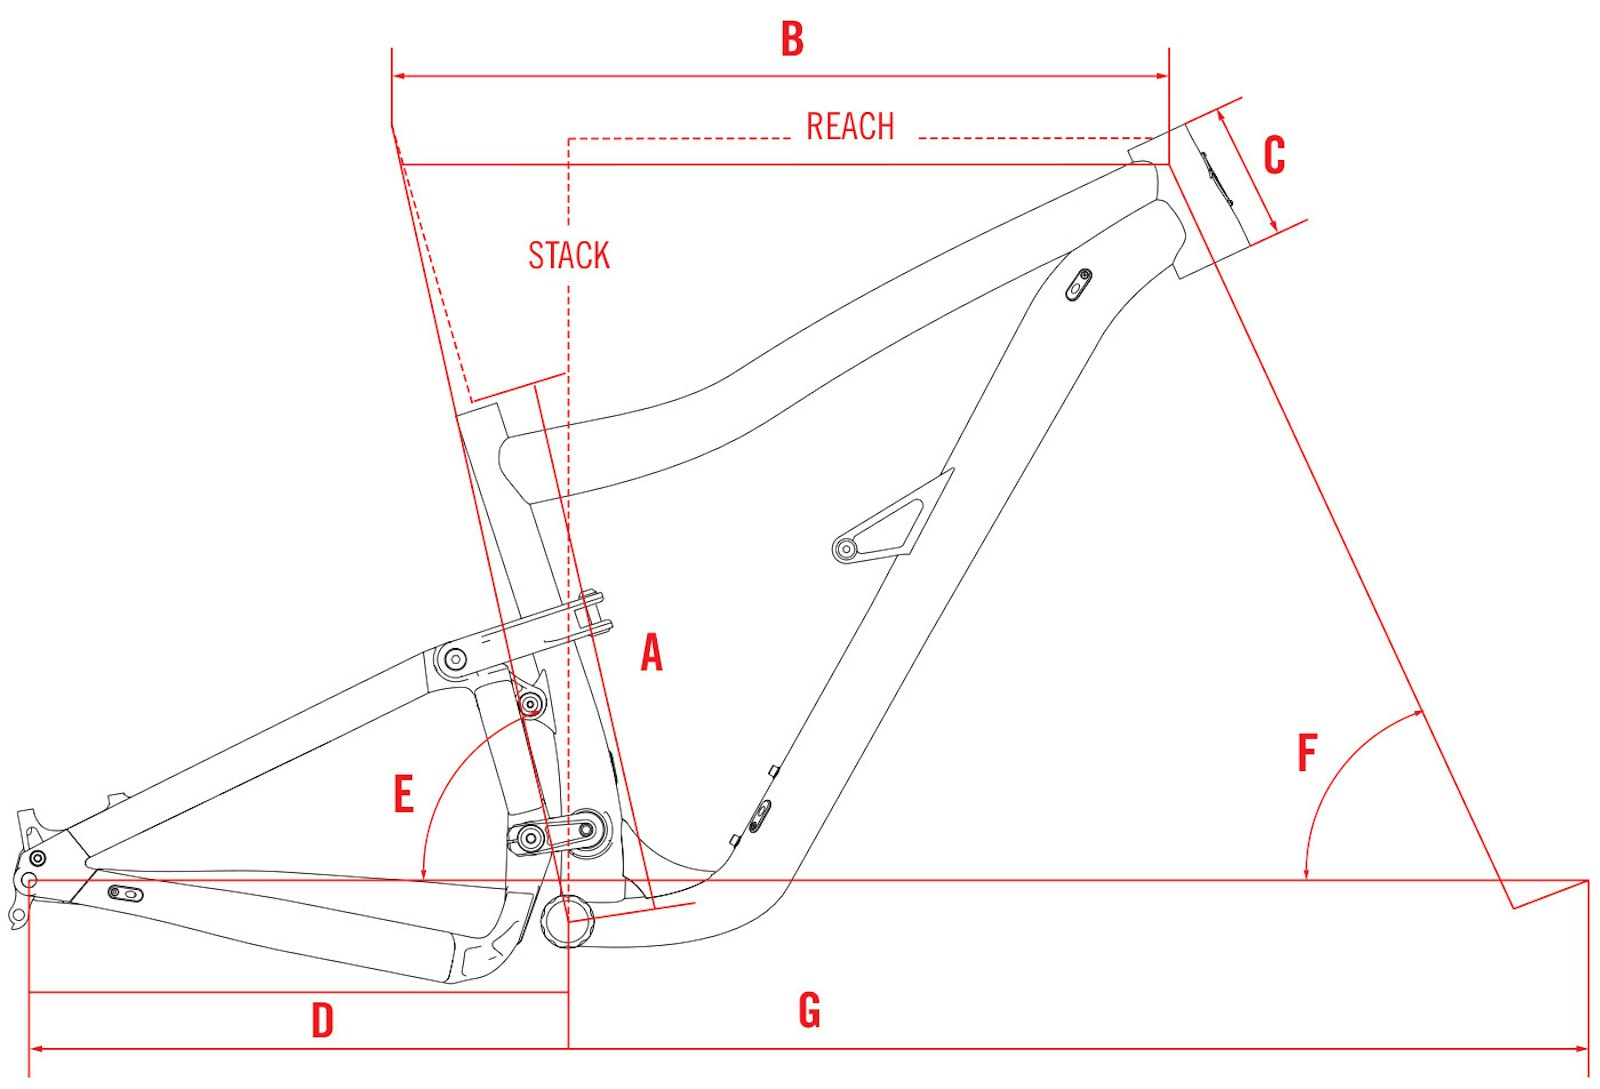
160mm Fork (572mm axle to crown)
| Nominal Size | Small | Medium | Large | X-Large | |
|---|---|---|---|---|---|
| Seat Tube Length | A | 368 14.5 | 380 15 | 432 17 | 483 19 |
| Top Tube Length | B | 573 22.6 | 603 23.7 | 632 24.9 | 655 25.8 |
| Head Tube Length (4mm stack of lower cup not included) | C | 90 3.5 | 100 3.9 | 110 4.3 | 120 4.7 |
| Chainstay Length | D | 435 17.1 | 435 17.1 | 435 17.1 | 435 17.1 |
| Seat Tube Angle | E | 77° 77° | 76° 76° | 76° 76° | 76° 76° |
| Head Tube Angle | F | 64.9° 64.9° | 64.9° 64.9° | 64.9° 64.9° | 64.9° 64.9° |
| Wheelbase | G | 1185 46.7 | 1216 47.9 | 1237 48.7 | 1262 49.7 |
| BB Height (with 2.6 Schwalbe Nobby Nicks) | 341 13.4 | 341 13.4 | 341 13.4 | 341 13.4 | |
| Stack | 613 24.1 | 620 24.4 | 629 24.8 | 642 25.3 | |
| Reach | 431 17 | 458 18 | 475 18.7 | 495 19.5 | |
| Standover | 705 27.8 | 750 29.5 | 750 29.5 | 760 29.9 | |
| Trail | 114 4.5 | 114 4.5 | 114 4.5 | 114 4.5 | |
| BB Drop | 30 1.2 | 30 1.2 | 30 1.2 | 30 1.2 | |
| Saddle height for seat tube angle | 650 25.6 | 700 27.6 | 750 29.5 | 810 31.9 |
Sizing Guide (Rider Height)
Dropper Post Saddle Height Calculations
Do not try to insert your post deeper than these measurements. Forcing the post can result in a seat tube failure.
IMPORTANT: Before riding, check the saddle to tire clearance with the dropper post fully dropped and the air out of the shock with frame compressed to bottom out. Small and Medium minimums are controlled by tire bottom out.
| Frame measurement | Small | Medium | Large | X-Large |
|---|---|---|---|---|
| Maximum Seatpost Insertion (mm) | 195 | 210 | 250 | 250 |
Bike Yoke Revive
Measurement from center BB to center of saddle rail (mm)
| Drop | Min/Max | Small | Medium | Large | X-Large |
|---|---|---|---|---|---|
| 125 | Min | 537.7 | 546.7 | 585.7 | 636.7 |
| Max | 652.8 | 664.8 | 703.8 | 754.8 | |
| 160 | Min | 607.7 | 604.7 | 620.7 | 671.7 |
| Max | 702 | 714 | 753 | 804 | |
| 185 | Min | 657.7 | 654.7 | 653.7 | 704.7 |
| Max | 702.8 | 714.8 | 753.8 | 804.8 | |
| 213 | Min | 723 | 720 | 719 | 770 |
| Max | 788 | 800 | 839 | 890 |
Fox Transfer
Measurement from center BB to center of saddle rail (mm)
| Drop | Min/Max | Small | Medium | Large | X-Large |
|---|---|---|---|---|---|
| 100 | Min | 527.5 | 524.5 | 578.5 | 629.5 |
| Max | 623 | 635 | 674 | 725 | |
| 125 | Min | 577.5 | 574.5 | 603.5 | 654.5 |
| Max | 673 | 685 | 724 | 775 | |
| 150 | Min | 627.5 | 624.5 | 628.5 | 679.5 |
| Max | 723 | 735 | 774 | 825 |
KS Lev
Measurement from center BB to center of saddle rail (mm)
| Drop | Min/Max | Small | Medium | Large | X-Large |
|---|---|---|---|---|---|
| 125 | Min | 565 | 562 | 598 | 649 |
| Max | 646 | 658 | 697 | 748 | |
| 150 | Min | 615 | 612 | 623 | 674 |
| Max | 686 | 698 | 737 | 788 | |
| 170 | Min | 668 | 665 | 664 | 715 |
| Max | 719 | 731 | 770 | 821 |
| Hardware | Torque Spec (Nm) | Thread Treatment / Notes |
|---|---|---|
| Lower Link 6mm Preload Bolts | 2 | Loctite 243 on threads, grease under bolt head |
| Lower Link 5mm Pinch Bolts | 10 | Loctite 243 |
| Swingarm to Clevis Pivot Bolts | 10 | Loctite 243 |
| Lower Shock to Clevis Bolt | 20 | Loctite 243 on threads, Ti anti-seize under the bolt head |
| Rear Brake Caliper | 6 | Loctite 243 |
| Upper Link Bolts | 10 | Loctite 243 |
| Forward Shock Mount Bolt | 10 | Loctite 243 on threads, grease on the shaft |
| Seat Binder | 5 | Ti anti-seize |
| Cable Ports | 2 | Grease |
| Derailleur Hanger Bolt | 25 | Dry (reverse thread!) |
| Bushings | Apply Slick Honey (grease) to all bushings during reassembly | |
| Hexle | There is not a numerical torque figure for the Hexle. We recommend tightening the 5mm with your multi tool that you carry with you. This way you’ll be able to remove it in case of a flat out on a ride. |